

Baked and bruised
A magical mousse

Something for spring


Brownies please

Z is for zucchini

I need cake

Cherries on top

The artful artichoke

I’ll start this post by saying sorry -- I’m late! My life has been a little hectic and so, in keeping with that theme, I’ll be adding some more quick-to-make and easy-to-eat recipes.
***
I find that the easiest, quickest way to ensure you have a delicious meal is finding one or two special ingredients to serve as the stars of your dish. I often look to vegetables – in winter hearty vegetables such as pumpkin, eggplant, kale, sweet potatoes, and in summer lighter items like leafy lettuce, fresh tomatoes, red peppers. Once in a while I find something new that becomes my favourite for the season.
 Jerusalem artichokes (also called sunchokes) are an interesting vegetable. These little strange, nubbly and knobbly roots (part of the sunflower family and not really related to larger, globe artichokes) are so much more delicious than they look.
***
They are easy to cook – no need to peel them either. I sautéed them with plenty of garlic, fresh herbs like bay and sage leaves, sea salt and lots of lemon. Cooking the artichokes over a medium heat for about 15 minutes allows them to become slightly sticky and caramelised but still retains a crunch. These artichokes had layered flavours that were slightly creamy, sweet and definitely nutty - unlike anything you’ve ever tasted! I served mine with a simple soup to make up the perfect dinner in a hectic week.

They are easy to cook – no need to peel them either. I sautéed them with plenty of garlic, fresh herbs like bay and sage leaves, sea salt and lots of lemon. Cooking the artichokes over a medium heat for about 15 minutes allows them to become slightly sticky and caramelised but still retains a crunch. These artichokes had layered flavours that were slightly creamy, sweet and definitely nutty - unlike anything you’ve ever tasted! I served mine with a simple soup to make up the perfect dinner in a hectic week.
sautéed jerusalem artichokes
serves 2 large servings
1 tbsp olive oil
2 large garlic cloves, sliced
400g Jerusalem artichokes ( 2 cups), cleaned and cut into 1 inch pieces
4 bay leaves – fresh or dried
a bunch of sage leaves
sea salt
1/2 lemon
some water
Place a large pan on medium heat, add olive oil, slices of garlic and let fry out 2-3 minutes to infuse oil. Add artichokes, bay and sage leaves, add pinch of sea salt and cook artichokes – moving them around once in a while. If pan dries out add a little water – place lid and cook for 10 minutes – making sure they don’t burn. Take lid off and cook for another five minutes or until they are cooked but still retaining crunch. Remove from pan and sprinkle with lemon juice. Serve alone or with another main dish – fish, green salad or soup. Enjoy!
Another simple supper
 You don’t have to sacrifice flavour and taste just because you don’t have a lot of time. I know I sound like one of those cooks on television but I do think there is something to what they’re saying. When I don’t have a lot of time but crave something delicious I look to one or two main ingredients to help me - for instance, my special ingredient tonight: the sweet potato.


For more simple Sunday suppers – see here
sweet sunday supper
2 large serving or 4 small
3-4 medium sweet potatoes/kumera, sliced into 1-2 inch chunky pieces
a few sprigs fresh thyme
1 tbsp olive oil
pinch sea salt and black pepper
1/2 red onion, sliced
1 cup cherry tomatoes, halved
1/2 cup red grapes
2 red chillies, sliced (used dried if you don’t have fresh)
1/2 cup fresh mozzarella cheese and parmesan cheese, grated
splash of balsamic vinegar or worcestershire sauce
Preheat oven to 220 degrees fan forced (this is hot but perfect because it will give a little charred flavour to the potatoes)
Prepare a baking tray with baking paper. Add sweet potato pieces, drizzle with oil and mix around. Sprinkle with salt, pepper and add thyme sprigs. Baked for 10 minutes and take out. Add onions, tomatoes, grapes, red chillies to tray and bake another 5 minutes. Take out sprinkle with cheese and bake for another 1-2 minutes or until melted. Take out, dress with a splash of balsamic or worcestershire sauce and serve with fresh rocket or salad greens – enjoy!
A simple sandwich

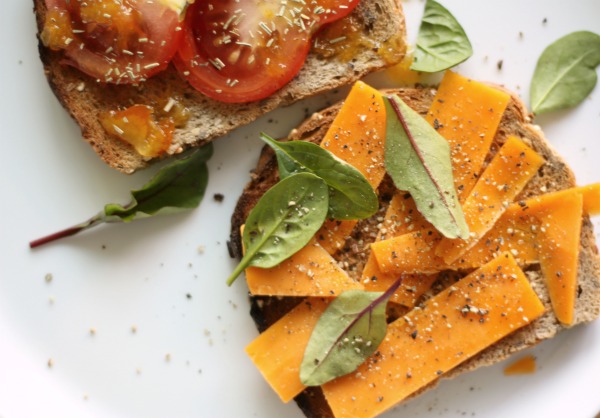

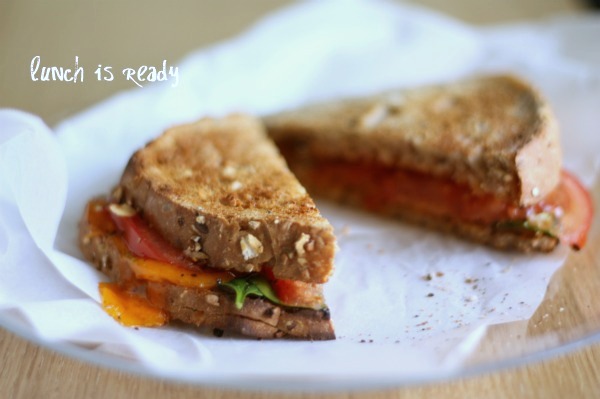
grilled cheese and tomato sandwich with marmalade and black pepper
makes one delicious lunch
two slices fresh wholegrain bread
1 garlic clove (keep whole)
3 slices tomato
a few slices of your favourite aged cheddar cheese (aged cheese has
a few slices of your favourite aged cheddar cheese (aged cheese has
the tangy flavour you need)
2 tsp orange marmalade
1/2 tsp dried rosemary
1 tsp freshly cracked pepper
Place slices in toaster to toast. Take out and while still warm rub the garlic clove over each slice (gently so that you just get a hint of garlic). Next place slices of tomato and cheese on pieces of toast. Drizzle with marmalade and sprinkle with dried rosemary and fresh pepper. Place pieces of toast together and microwave for 30 seconds or until just melted. If you don't have a microwave or don't use one - warm up the sandwich in a hot oven for a few minutes or until cheese is melted. Enjoy!
Coffee & cookies


Yes, I know that caffeine and sugar aren’t the healthiest options for sustenance. But my oatmeal cookies are not all that sweet, and they do a great job satisfying afternoon cravings and giving you a little boost of energy.
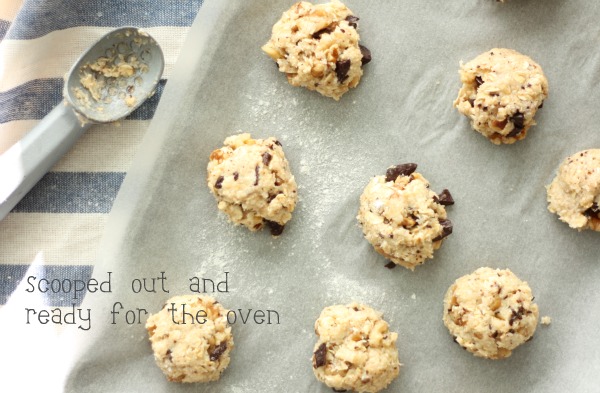 My oatmeal cookies use wholegrain rolled oats, coconut, walnuts and of course, smooth, rich and anti-oxidant packed dark chocolate. Once the batter was made, I used an ice cream scoop to make small little imperfect balls, pressed them down a little and baked for 10-15 minutes. Easy to make and delicious to eat – the perfect afternoon treat (with your coffee!).

oatmeal-coconut-walnut cookies
makes about 15 fat cookies
1/4 cup canola oil
1 egg
1 tsp vanilla extract
2 tbsp soy milk
1/4 raw sugar
1 cup desiccated coconut
1 cup wholegrain oats
1/2 cup plain flour
1 tsp baking powder
pinch sea salt
1/4 cup walnuts, roughly chopped
1/4 cup dark chocolate, chopped
Preheat oven to 180 degrees C.
In a large bowl add oil, egg, vanilla, soy milk and sugar and mix until well incorporated. In a separate bowl mix coconut, oats, flour, salt and baking powder. Mix dry ingredients into wet ingredients and stir through walnuts and chocolate. Using an ice cream scooper or large spoon make little balls and place onto lined baking tray. Bake 10-15 minutes or until just golden. Enjoy with your afternoon coffee!
Cheese is what you need


I love the creamy, smooth quality of the cheese against the crunch of the biscuit base and the sweet aftertaste. You don’t need a lot of sugar in cheesecake – somehow its richness is satisfying enough.

Sweet, creamy, tangy and refreshing – are some of the words that come to mind after tasting my baked citrus cheesecake. I used the zest and juice of lemon in the cake and served it with fresh mandarins. I kept the cake simple so that the freshness of ingredients would stand out; fresh ricotta, cream cheese, eggs, lemon and agave made up the body of the cake and I used wholemeal biscuits for the base.

My baked citrus cheesecake was super easy to make so I hope you try it out for yourself!
baked citrus cheesecake
serves 6-8
crust
125g/12 biscuits wholemeal biscuits (you could also use graham crackers, granita)
1 1/2 tbsp melted butter
filling
250g or 1 1/2 cups cream cheese (package)
250g fresh ricotta cheese
3 eggs – 2 whole and 1 yolk
zest from 1 lemon, juice from half
2 tbsp dark agave syrup (use honey or other sweetner if you don’t have it)
1 tbsp demerara sugar for sprinkling
Preheat oven to 170 degrees C.
Line the bottom of a 20cm springform pan with baking paper.
To make the crust, place biscuits in a processor and process until biscuits resemble sand-like texture. Place into bowl with melted butter and mix through. Place mixture into pan and press down. Bake 5 minutes or until golden and take out to let cool.
To make filling: in a processor or with a beater mix both cheeses until softened, add in eggs one at a time, zest of lemon and juice, and agave syrup. Beat until everything becomes smooth . To get a dense and rich cheesecake make sure not to beat too much air into mix – it will just end up flopping in the centre. Once the filling is smooth, pour into pan on top of crust and sprinkle with demerara sugar (I do this to get a little bruléed crust). Cover pan with foil and place into centre shelf to bake* for 45 minutes – remove foil and bake another 15 minutes or until centre is firm. Once baked, take out and let cool – refrigerate for a few hours – if you can wait! To serve, add mandarins or any other citrus fruit – pour over more agave syrup or use jam to add more sweetness. Enjoy!
*These are baking guidelines since ovens do vary – just make sure to keep an eye on the cake checking every 20 minutes or so.
My chocolatey cure


It's made with just a few basic ingredients like chocolate (dark and good quality), butter, sugar, eggs and a little flour. I added some vanilla and a bit of espresso just for a change and an extra kick of caffeine.

These are my delicious little cakes – try them out for yourself, especially on a bad day and I promise you’ll feel better!
chocolate espresso molten cakes
makes two little cakes
*use organic where possible
60g dark chocolate – I used half 85%, half 70%
1 1/2 tbsp butter
1 tsp vanilla extract
1 tsp espresso powder
2 eggs
1 1/2 tbsp confectionary sugar
2 tbsp plain flour, sifted
Preheat oven to 220 degrees C.
In a double boiler (bain marie) melt chocolate pieces and butter. Take off heat once melted and let cool a little and mix in espresso powder and vanilla. Prepare two ramekins; grease with butter and dust with flour. In a mixing bowl, add eggs and sugar and beat until fluffy and a little pale in colour – about 3-5 minutes. Gently add in chocolate mix, stir carefully until combined and then fold in sifted flour, one spoon at a time. Pour into ramekins and bake for about 7-9 minutes – watching/checking that outside is cooked but inside still moist and gooey. Remove and let cool a little before tipping out onto dish. Finish with a dust of cocoa powder and serve with espresso or cappuccino or anything else delicious!
nb: my cakes weren’t as gooey on the inside as I would have liked – I probably left them in the hot ramekins a little too long.
Flavourful flakiness

When I was little my sister and I frequented a convenience store nearby our house. The store was a kids' dream – full of an endless variety of candy. While I would often go for hard, sugary candies like 'gobstoppers', my sister typically went for a yummy pastry filled with jam and cream, aptly named ‘passion flakie’.

Over time I have also come to appreciate creamy, flaky pastry items. While I do sometimes crave the trashy flavours of a store-bought, plastic-wrapped dessert, most often I decide to recreate a fresh, somewhat healthier version at home.
 So here it is – my version of the passion flakie. I used fresh rhubarb to make a rhubarb, ginger and raspberry compote for a much more adult and classy version of this dessert. I made a cream cheese filling; sweet, creamy and vanilla-flecked. I used puff pastry – store-bought because I didn’t have the time or energy to make puff pastry and well, I just don’t make it as beautifully as I would like to. Once assembled together, these delicious little puffs of cream and sweet-sourness were devoured by my husband – just a few left!

rhubarb, raspberry and ginger cream puffs
makes about 10 little puffs – depending on how generously you fill them!
puff
1 package puff pastry
flour for dusting
icing sugar for sprinkling
compote
300g rhubarb, cut into 2 inch pieces
100g raspberries – frozen is fine
1/2 tsp grated fresh ginger
250ml water
30g raw sugar
2 inch piece lemon peel
1/2 vanilla bean
cream cheese
125g low fat cream cheese
1tbsp thickened cream
1 tbsp dark agave syrup
juice of a lemon wedge
Preheat oven to 220 degrees C
For the pastry: dust surface with flour and roll out pastry. Using a cookie cutter, cut out 8cm circles and place onto baking sheet lined with baking paper. Place tray of pastry in fridge while prepping other ingredients.
For compote: place all ingredients except raspberries into pot and cook on medium heat for 5 minutes or until rhubarb is just soft. Take out rhubarb and add raspberries. Cook until thickened and raspberries have broken down. Add rhubarb back into pot and adjust for sweetness. Take off heat and let cool.
For cream cheese filling: bring cream cheese to room temperature, mix with other ingredients and place into fridge until ready to assemble.
Dust pastry with icing sugar and place into hot oven. Bake 5-6 minutes or until golden. Take out, let cool and slice through the middle to create two halves. Assemble the puffs, first with a layer of cream and then compote, add the top layer and dust generously with icing sugar. Enjoy!
Cheese & Chutney


The coldness urges me to grab a blanket, a glass of red wine and make a scrumptious snack of baked goat’s cheese with quince and pear chutney…so warming and decadent.
***
This baked cheese is awesome -- not just good but amazingly awesome. I’ve used the same recipes on other cheeses like camembert and brie – but goat’s cheese is a nice change. Full of flavours like garlic, rosemary and wine. It's creamy, gooey goodness.

Having some fruit sitting in my kitchen, I decided to make a quick chutney to go along with my cheese. Sweet and full of earthy tastes provided by sage and the spiciness added by peppercorns, the chutney was the perfect addition to the salty and smooth texture of the cheese. The perfect night in...

baked goat’s cheese
serves 4-6 for a party
1 package of goat’s cheese (like goat brie) – you can also use standard brie or camembert
1 clove garlic, thinly sliced
1 sprig rosemary
2 tsbp red wine – I used a full bodied cabernet
freshly cracked pepper
Preheat oven to 180 degrees C.
Take cheese out of package and place into small baking dish or foiled oven tray. Using a knife, make a fair number of slits halfway into the cheese, making sure not to damage the rind too much. Place a garlic slice and few pieces of rosemary into each little slit – carefully pushing down into the cheese. Next, pour wine over the top, sprinkle with pepper and place into oven to bake for 10-15 minutes, or until oozing with delight!
Take out and serve with crackers and chutney
spiced quince and pear chutney
1 quince, peeled, cored and chopped
2 small pears, peeled, cored and chopped
1 star anise
a few sage leaves shredded
1 sprig rosemary, take leaves off
1 tsp freshly cracked pepper
1/2 tsp sea salt
2 tsp brown sugar
1 cup water
1 wedge of lemon
Place all ingredients into medium sized pot and bring to a boil for a few minutes, reduce heat a little and let cook until flavours have blended and water has evaporated. If not cooked enough, add more water to cook out until you reach desired consistency. Adjust for seasoning and that’s it. Let cool and serve with cheese and bread. This chutney keeps for a few days in the fridge – unless you decide to preserve it. Enjoy!
Cold and creamy cups of custard

magical treat.

My custardly creation is based on a traditional crème caramel making process: I use a base of brown sugar caramel and then add a mix of delicious coconut cream, milk, eggs, dark agave syrup and lime zest. I bake my little pots of creamy goodness and then place them in the fridge to get a wonderfully wobbly but firm texture.

baked coconut custards with lime
serves 6
*use organic where possible
1/3 cup brown sugar
3 eggs
pinch sea salt
270 ml coconut cream
200 ml low fat milk (any kind will do)
2 tbsp dark agave syrup (or a similarly sweet sweetner)
zest of 1 lime
Preheat oven to 180 degrees C
Add brown sugar to a small pot on medium heat and let caramelize. Pour caramel into 6 ramekins and ensure it covers the bottom. In a separate large bowl, beat 3 eggs, add coconut cream, milk, salt, and agave syrup and lime zest and mix well. Divide mix between ramekins and place into roasting tray – fill with 1inch of hot water (to create a water bath) and place into oven*. Bake for 40-45 minutes or until set. Let cool and place into fridge. To serve carefully tip out custards onto plate. Yum!
*note – I covered the custards with foil for half the baking time – if you don’t want any colour on the top, make sure to cover the whole time.
The greatness of gourds


Each time I make pumpkin soup I change my recipe. This time, I roasted the pumpkin to caramelize the sugars, adding another layer of flavour. Additional ingredients included apples, garlic, rosemary and caraway seeds – a spice that comes from the parsley family and has a very distinct flavour that goes well with hearty foods. I use caraway for a number of recipes (a delicious one is my rye crispbreads).

This soup is easy to make and much healthier and fresher than any store-bought variety. It only takes 40 minutes to make and it’s perfect for lunch or dinner. In the spirit of using everything, I cooked the pumpkin with the skin (yes, this is edible - and full of fibre!) and used the toasted seeds for a garnish. For a final touch I added a little umami flavour with red miso paste. The miso provided a salty, sweet and earthy taste and was an excellent replacement for the stock I didn’t have!
roasted pumpkin and apple soup
makes 8 serves or more
1 kg pumpkin
2 pink lady apples (or any other sweet apple)
2 tbsp olive oil
1 tsp sea salt and pinch of pepper
2 sprigs rosemary
1 tsp dried sage
3 cloves garlic – crushed
1 tsp caraway seeds
2 tbsp red miso paste
3 cups (approx 700ml) water
1 cup milk (any kind you like)
Preheat oven to 200 degrees C
Deseed pumpkin (reserve seeds) and apple and chop into small, even pieces. In a bowl, add pumpkin, apple, olive oil, salt and pepper, rosemary, sage, garlic and caraway – mix well and place onto lined
baking sheet.
Bake for 35 minutes or until pumpkin is soft. Remove woody part of rosemary and garlic skins. For ‘stock’ – in a bowl add 3 cups of boiled water to 2 tbsp miso paste and mix. Blend soup in portions –
adding 1 cup of miso water at a time to pumpkin and apple mix (this helps to ensure that you use the right amount of water – not too watery, not too thick).
Place blended soup into pot and add 1 cup of milk (again, this might need to be adjusted based on desired consistency). Check for seasoning and add more salt if necessary. I served my soups with some fresh basil and toasted pumpkin seeds. Yum!
Tapioca temptation


A number of cultures use tapioca – a starch that comes from the cassava root – in their cooking and baking. Growing up in my Indian home, we used tapioca to make payasam. A milk (cow’s or coconut) based dessert, sweetened with sugar or jaggery (a dark sugar byproduct that tastes like molasses) and spiced with saffron and cardamom, payasam is an Indian dessert staple. There are a number of different versions of payasam, depending on which ingredients you select from a long list that includes rice, lentils, semolina, raisins, and almonds.

For my tapioca image overhaul, I decided to use one of my favourite flavours: coconut. I cooked the tapioca in water and separately made a liquid mix of coconut milk and coconut sugar, vanilla and a pinch of cardamom. I served this rich, coconut infused pudding with raspberries and flaked almonds - simple and delicious!
coconut tapioca with vanilla and raspberries
serves 4
1/2 cup tapioca pearls
4 cups water
1 1/2 cups coconut milk
2 tbsp coconut sugar (or alternative sweetner)
2 tsp vanilla extract
pinch cardamom
Bring a pot with water to boil, add in tapioca pearls and cook while stirring – about 10-12 minutes until almost transparent. Strain and keep aside. In another pot, add coconut milk, coconut sugar, vanilla and cardamom and mix well on medium heat. Add cooked tapioca and cook a few more minutes (adjust for taste and thickness). Take off heat and keep aside to cool down. I like to refrigerate my tapioca for a few hours to let the flavours infuse and to ensure the pearls increase in volume, which adds to the creaminess of the dish.
If using raspberries, add a bit of sugar and mix to form a delicious sweet liquid and add to tapioca and finish with almonds. Enjoy!
A little foodie photography project

Dear friends I have something excitng to share with you. A little while ago, my new blogger friend Aurelie at Pause Gourmande (a lovely French blog) asked me to participate in an interesting blogger project. She was going to put together an online magazine and asked me to share a few photos and recipes.
***
Here is the link to the magazine’s spring issue. I think it looks great and that Aurelie did a fantastic job of turning this project into a beautiful magazine. I love the compositon of her photographs and the light and subject is always gorgeous.
***
The magazine and all the recipes (spiced chocolate date cakes and red wine braised lentils) are in French. I adore the French language and encourage you to try my recipes out! For those who don't read French – no worries – I’ve posted everything about the recipes below…

A common dessert here in Australia is sticky date pudding – a velvety rich date cake topped with a buttery rich caramel sauce. Not that I don’t love indulging in creamy, heavy desserts (they definitely have a place in my kitchen!), but the warm and sunny weather here often inspires me to make something lighter yet still rich and generous. These spiced chocolate cakes are moist and have a great natural sweetness provided by the dried dates. I use warming and fragrant spices like cinnamon, cardamom and ginger to add a kick to the subtle flavours of dark chocolate. This may sound a little heavy but these little bundt cakes require only a small amount of flour, which makes them moist, light and airy - just perfect for a lovely sunny day! Once cooked and cooled I keep them in the fridge because I love the texture of a cooled spongy cake. You can serve the cakes on their own, dusted with cocoa or with some vanilla whipped cream and/or ice cream. Try making them and you won’t be disappointed.
recipe makes 4 smallish bundt cakes
*use organic ingredients where possible
180g dates (pitted)
280 ml water
1 tsp baking soda
60g dark chocolate – broken into small pieces
60 g butter, softened
20g raw sugar
2 eggs
100g self raising flour (if using plain flour make sure to add baking powder as a raising agent)
1 tsp ground cinnamon
1 tsp ground ginger
½ tsp ground cardamom
pinch sea salt
Preheat oven to 160 degrees Celsius.
Place a small pot with dates and water on medium heat and bring to the boil. Once at boiling point, turn off the heat, add baking soda and let sit 10 minutes to cool – then blend mixture until reaches puréed consistency and stir in chocolate pieces. In the meantime, in a separate bowl beat butter and sugar until creamy, add in eggs one at a time until well incorporated. Add date mixture to bowl and stir well. Sift in flour, ground spices and pinch of sea salt. Pour thick batter into greased bundt moulds and bake on centre shelf in oven 30-40 minutes until knife inserted comes out clean. Take out and let cool on racks. To finish dust cakes with dark cocoa powder and enjoy.

Lentils are a common dish at my house – they are not only inexpensive but they are also wonderfully versatile and can carry lots of different flavours. A lot of Indian cooking is based on the use of lentils: it not only adds protein and heartiness to vegetarian dishes but also thickens soups and sauces. There are many varieties of lentils but one of my favourites (which actually isn't that common in Indian cooking) is the Puy lentil or French green lentil. Since puy lentils hold their shape during cooking, they keep their lovely toothsome texture. The small little discs of speckled green lentils are not only useful for salad type dishes but they are also beautiful to serve on a plate. The flavours in this dish aren’t complicated – I sautéed onions, garlic and carrots, deglazed with red wine, used lots of fresh herbs like bay leaf, rosemary, thyme and basil and finished it with a splash of balsamic vinegar for an added richness and sweet tang. I served my lentils with sautéed chicory greens and pan fried halloumi cheese.
red wine braised lentils with fresh herbs
recipe serves 4
1-2 tbsp olive oil
½ red onion, finely chopped
1 carrot, peeled and finely chopped
2 garlic cloves, finely chopped
3 fresh bay leaves
1 sprig rosemary
1 sprig thyme
1 cup Puy lentils, rinsed
½ cup red wine (I used a full bodied wine like Cabernet Sauvignon)
3 cups water or stock
sea salt and cracked black pepper
1-2 tbsp balsamic vinegar
1 cup fresh cherry tomatoes
sprinkle of dried chili
Place a Dutch oven or sauté pan with high edges on medium heat. Once pan is hot, add oil and onions, carrots and garlic to sauté for 5 minutes. Add bay leaves, rosemary, thyme and lentils – stir for a few minutes. Add red wine to deglaze pan and cook off alcohol – about 1-2 minutes. Add 3 cups of water or stock and simmer until lentils are just cooked about 20-25 minutes. Make sure to add more water if needed to finish cooking lentils. Season lentils well with sea salt and pepper, add balsamic vinegar and stir 1-2 more minutes. Once off the heat, add a little extra virgin olive oil and stir through fresh cherry tomatoes and a sprinkle of dried chili.
Serve lentils on their own or with sautéed chicory and pan fried halloumi as I’ve done. Of course, this dish must be enjoyed with glass of delicious red wine.
Subscribe to:
Posts (Atom)


