Scintillating squash


Summertime calls for many things – icy cold treats, fresh fruit for breakfast, cold mint tea…all things fresh and light.  There is, however, one food very wintry in nature that I cannot resist even in summer: squash.
 ***
It may be a hearty root vegetable but there is no denying its bright, golden-orange hue belongs in my notes for summer …

This vegetarian pasta has everything you’re looking for – fresh, delicious but also healthy and filling (but I promise you can still go swimming afterwards!). A little bit like a pasta primavera – a springtime vegetable medley – this pasta has it all. I sautéed  onion, celery, carrots, garlic and butternut squash – added plenty of white wine, fresh parsley and bay leaves. I finished it off with a hint of mace, lots of freshly cracked pepper and a touch of light cream. A perfect summer treat.

summer squash pasta

serves 4-6

1 tbsp olive oil
1/2 red onion, sliced finely
2 bay leaves
2 stalks celery, sliced
2 cloves garlic, minced
1 large carrot, peeled and chopped
3/4 kg butternut squash (any pumpkin is fine), peeled and cut into sizeable pieces
1 1/2 cups white wine (I used pinot grigio because I was drinking it!)
1 cup peas
1/4 cup light cream
pinch of mace (use nutmeg if you don’t have mace)
sea salt
freshly cracked pepper
bunch of fresh parsley
500g wholemeal pasta 

Place a large pot on medium heat – wait a few minutes then when hot add oil, onion, bay, celery, garlic and carrot – sweat for 5 minutes. Add the squash and cook, stirring every minute or so for about 10 minutes – add white wine to deglaze the pot. Cook another 5 minutes or until squash is tender. At this point, place water in a large pot to boil for pasta. Salt the water, add pasta and cook until al dente (about 11-12 minutes for wholemeal pasta). To finish the sauce, add peas and cook 2 minutes, then add cream, mace, salt and pepper to taste. Finish the sauce with fresh parsley and dried chili if desired. I also added cheese – because I simply love it! Enjoy.

Party-time


Happy New Year folks! I hope you all enjoyed your holidays and that much fun was had while copious amounts of food and wine were consumed – this is how I like to celebrate! Speaking of celebrations, December was a month of fun at my house. It’s the month of my birthday and my wedding anniversary – and those great gift-giving days of Christmas fun – so many reasons to eat, drink and be merry.

***

For my birthday I made a few tried and tested party foods. Dips are never a miss at parties – finger foods are not only easy to make but serve a great purpose; you can hold your drink in one hand and eat with the other, all the while making conversation – this is efficiency people :). For this special night I made a simple 4 ingredient hummus dip and a charred eggplant dip (somewhat like a baba ganoush).

For the end of the night nothing works better than the famous ‘trashy truffle’. This particular dessert, inspired by a Paula Dean recipe for cookie dough truffles, was aptly named by my sister. I tweaked the recipe a little and came up with sweet little pieces of chocolately drizzled trashy joy, with a slight biscuity crunch. Yum, I love parties.


Recipes
4 ingredient hummus
400g chickpeas, drained
1 tbsp tahini paste
juice from 1 small lemon
extra-virgin olive oil 2-3 tbsp (plus more for finishing)

Place chickpeas, tahini and lemon juice in food processor and blend. While blending drizzle in olive oil until mixture resembles smooth, creamy paste. If too thick, add a little water to thin out. Season with sea salt and give a final mix. Place into bowl and finish with a little more olive oil and a touch salt.

charred eggplant dip
1 large eggplant
1/4 red onion, finely chopped
1/4 cup greek/full fat yoghurt
sea salt and freshly cracked black pepper
extra-virgin olive oil, to finish

First char the eggplant on the bbq (as I have done) or grill. Let cool and remove most of the blackened bits (keeping a little is fine and imparts a smoky flavour). Next, chop up the softened eggplant (it falls apart easily), mix in onions, add salt and fold through the yoghurt (here I didn't over-mix as I like the look and taste of uneven layers of yoghurt and eggplant). Finish with fresh pepper and a drizzle of extra-virgin olive oil.

trashy truffles
(slightly adapted from Paula Deen)
makes about 5 dozen truffles
1/2 cup organic butter
3/4 cup brown sugar
1 tsp vanilla extract
2 cups organic plain flour
1 can condensed milk
1/2 cup finely chopped biscuits (I used something like a graham cracker but use anything you fancy)
150g milk chocolate, melted

In a large mixing bowl, cream butter, sugar and vanilla. Gradually mix in flour and add condensed milk. Mix in biscuit crumbs and shape dough into 1 inch balls (dip fingers in flour to make it easier to roll). Place on waxed/baking paper and chill in fridge for an hour.

Melt chocolate in a double boiler on low-heat. Take out tray of truffles and drizzle with melted chocolate – I dipped some whole in the chocolate and kept some simply drizzled – it’s up to you!


Happy Holidays.


Happy Holidays Everyone! A meandering mango has taken a short break this holiday season but I'll definitely be back with more things delicious and beautiful in the new year!

Sublime smoothie


There is a place in Toronto that sells my most favourite smoothie – a date almond and banana smoothie. It's almost more like a thick milkshake – rich, creamy, sweet and not even bad for you!

A tempting tart


Spring is in the air – it’s sunny and breezy and fresh in Sydney. For the rest of my Northern hemisphere friends,  I know it’s strange to hear of warm weather when snow is on the way for many of you! To celebrate spring I’ve made something filled with colourful vegetables: a spring vegetable tart.

All frittered up


I don’t usually think of myself as a person who finds comfort in a particular routine; in fact my life has been driven by change and randomness – even in my love for food.  Very rarely do I have foods that I eat every day – or every Tuesday etc. I thrive on change…

Another cheesy cheesecake


If you’re a regular visitor to my blog then this post on yet another cheesy baked item won’t be a surprise. We love cheesecake. When I say ‘we’ I mean my husband M and I -- cheesecake is one of our favourite desserts.

Buttermilk for baking


Buttermilk is an interesting ingredient that is often overlooked. Of course it has a long history of use in many cultures – I grew up with buttermilk as a staple in our home, and Northern European cultures also drink plenty of it. But somehow the benefits of using it for cooking aren't always appreciated.

Eat your veggies


This morning I had my favourite combination for breakfast: a cup of hot coffee, a banana, and a delicious little muffin. Not a regular muffin but a pumpkin-carrot one with light orange glaze. OK – the glaze part doesn’t really sound like healthy breakfast but we are eating our veggies here, so no complaints!

Baked and bruised


Pastry making is an art that I never really had an interest in until I went to cooking school.  It's there that I learned to make different types of pastry – sweet, savoury and the famously scary puff. Of course the perfectionist  in me wanted to do the best job I could. Well, it turns out I can’t make a very good puff pastry – but I find it comforting to know that many great chefs have shared that they can’t either. Thank goodness.

A magical mousse


Did someone say chocolate? Yes, but not just any chocolate – dark, rich and creamy and smooth chocolate mousse. I apologize for the delayed first post of the month. I’ve been feeling a bit stuck -- it's that time of year where I have to re-think life and work, and torture myself with deep and existential questions.

Something for spring


Spring in Sydney – an end to the colder months and a welcome to longer, sunnier days and flowers. It’s just the beginning of my favourite time of year, and to celebrate it I put together a few spring-inspired foods.
At the grocer, I picked up a bunch of vegetables and herbs. I made a simple salad of sliced vine-ripened tomatoes, cherry tomatoes and torn basil and dressed the two ingredients with extra-virgin olive oil, balsamic and freshly cracked black pepper - a light vegetable salad. Of course, if this was going to be a celebration of spring I had to place something exciting on the table. What’s more of a treat than fresh oysters!

Brownies please


Like the rest of those foodies out there I love everything about food – searching through stores and markets for the best produce, talking about food, eating it and of course cooking and baking. When I’m in my kitchen with the ingredients I love I’m a happy person; conceptualizing a dish from start to finish and then working to create it is not only stress-relieving but also a wonderful creative outlet.

Z is for zucchini


I was given a few zucchinis the other day and wondered what I could make with this beautifully fresh and green vegetable. I love the taste and texture of raw sliced zucchini in my salads or alternatively in stick form with a delicious dip of hummus. I don’t really love the cooked version – sorry ratatouille lovers (I did love the film though!)

I need cake


A bad week – ups and downs and everything in between – calls for some cake. As life moves on we get busy and forget to take a moment to stop and relax and just be still. Stillness requires food of course – and what better food than cake.

Cherries on top


Cherries are such a beautiful fruit – small, almost berry–like, dark and sweet, the perfect pick-and-eat fruit.  Cherry trees are also some of the most prettiest trees out there – their blossoms so gorgeous and pink. I have many childhood memories of having kind of overdosed on fruit - sitting under cherry trees in friends' backyards, happily eating way too many cherries.

The artful artichoke


I’ll start this post by saying sorry -- I’m late! My life has been a little hectic and so, in keeping with that theme, I’ll be adding some more quick-to-make and easy-to-eat recipes. 
***
I find that the easiest, quickest way to ensure you have a delicious meal is finding one or two special ingredients to serve as the stars of your dish. I often look to vegetables – in winter hearty vegetables such as pumpkin, eggplant, kale, sweet potatoes, and in summer lighter items like leafy lettuce, fresh tomatoes, red peppers. Once in a while I find something new that becomes my favourite for the season.
Jerusalem artichokes (also called sunchokes) are an interesting vegetable. These little strange, nubbly and knobbly roots (part of the sunflower family and not really related to larger, globe artichokes) are so much more delicious than they look.
***
They are easy to cook – no need to peel them either. I sautéed them with plenty of garlic, fresh herbs like bay and sage leaves, sea salt and lots of lemon. Cooking the artichokes over a medium heat for about 15 minutes allows them to become slightly sticky and caramelised but still retains a crunch. These artichokes had layered flavours that were slightly creamy, sweet and definitely nutty - unlike anything you’ve ever tasted! I served mine with a simple soup to make up the perfect dinner in a hectic week.

sautéed jerusalem artichokes
serves 2 large servings

1 tbsp olive oil
2 large garlic cloves, sliced
400g Jerusalem artichokes  ( 2 cups), cleaned and cut into 1 inch pieces
4 bay leaves – fresh or dried
a bunch of sage leaves
sea salt
1/2  lemon
some water

Place a large pan on medium heat, add olive oil, slices of garlic and let fry out 2-3 minutes to infuse oil. Add artichokes, bay and sage leaves, add pinch of sea salt and cook artichokes – moving them around once in a while. If pan dries out add a little water – place lid and cook for 10 minutes – making sure they don’t burn. Take lid off and cook for another five minutes or until they are cooked but still retaining crunch. Remove from pan and sprinkle with lemon juice.  Serve alone or with another main dish – fish, green salad or soup. Enjoy!

Another simple supper


You don’t have to sacrifice flavour and taste just because you don’t have a lot of time. I know I sound like one of those cooks on television but I do think there is something to what they’re saying. When I don’t have a lot of time but crave something delicious I look to one or two main ingredients to help me - for instance, my special ingredient tonight: the sweet potato.
Ok here I go…Sweet potatoes are an absolutely wonderful, often overlooked vegetable. They are a root vegetable – not to be confused with potatoes which are 'tubers'. They're not as starchy as potatoes and full of nutrient rich beta-carotene – which works to boost immunity and sight (much like carrots). Sweet potatoes are also full of vitamin C, potassium, fibre and so much more. I’ve even heard people say it’s the most healthy vegetable of all.
It’s crazy when you think that something that tastes this sweet, creamy and rich could be so wonderfully good for you too. I combine sweet potatoes with a few other delicious ingredients – cherry tomatoes, fresh thyme, red onions and grapes – topped with mozzarella and parmesan and baked until wonderfully golden, gooey and crisp.
Just twenty minutes and you have supper. Sundays like this definitely work for me.

For more simple Sunday suppers – see here

sweet sunday supper
2 large serving or 4 small

3-4 medium sweet potatoes/kumera, sliced into 1-2 inch chunky pieces
a few sprigs fresh thyme
1 tbsp olive oil
pinch sea salt and black pepper
1/2 red onion, sliced
1 cup cherry tomatoes, halved
1/2 cup red grapes
2 red chillies, sliced (used dried if you don’t have fresh)
1/2 cup fresh mozzarella cheese and parmesan cheese, grated
splash of balsamic vinegar or worcestershire sauce

Preheat oven to 220 degrees fan forced (this is hot but perfect because it will give a little charred flavour to the potatoes)
Prepare a baking tray with baking paper. Add sweet potato pieces, drizzle with oil and mix around. Sprinkle with salt, pepper and add thyme sprigs. Baked for 10 minutes and take out. Add onions, tomatoes, grapes, red chillies to tray and bake another 5 minutes. Take out sprinkle with cheese and bake for another 1-2 minutes or until melted.  Take out, dress with a splash of balsamic or worcestershire sauce and serve with fresh rocket or salad greens – enjoy!

A simple sandwich


In the world of food the word 'simple' is used a lot and in quite different ways. These days, when life is hectic for so many people, to say that a recipe is 'simple' is a sure-fire way to sell it. Often a simple recipe implies that it will only use a few ingredients (hence cooking shows and books aptly name 'four' or 'five ingredients') and that assembly is straightforward and quick (30 minutes or less). My interpretation of simplicity might be a little different: for me, it has to do with using fresh ingredients - foods that haven't been processed too much already. Saying that a dish is simple doesn't necessarily imply a lack: the combination of a few simple ingredients can create something quite spectacular.
 
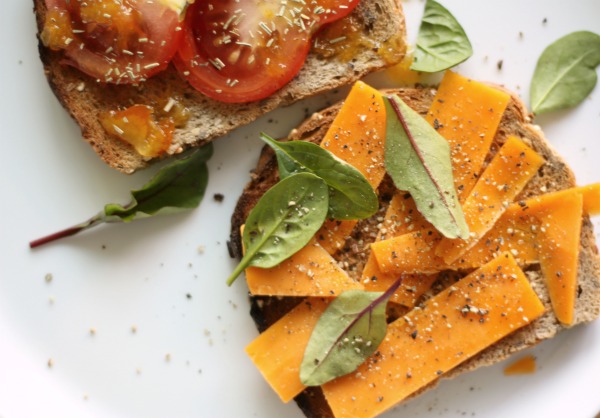
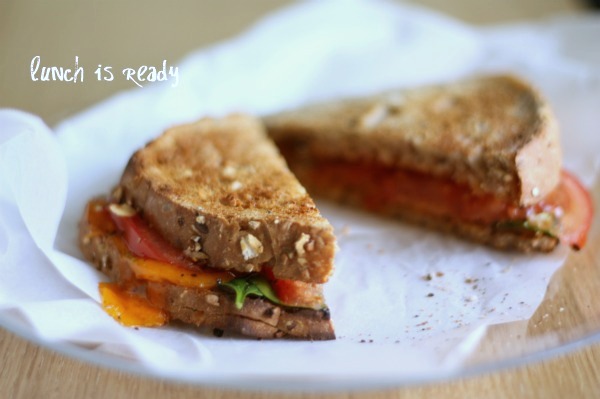
My 'simple sandwich' consists of a number of tasty items - bread, cheese, tomatoes, fresh greens - and a few little added touches like orange marmalade, garlic, dried rosemary and freshly cracked pepper. What is not simple about this sandwich is the flavour - tangy, salty, sweet and a little spicy, almost umami-ish. The textures of the soft, slightly chewy melted cheese with the crusty bread go perfectly against the smooth sweetness of the marmalade and the little kick of black pepper. So easy to assemble - no pan involved. All you need is a toaster and dare I say microwave (you won't often find me encouraging the use of microwaves but hey - thirty seconds to food heaven is so worth it).
This sandwich has become a favourite of mine - who knew simple could taste so good!

grilled cheese and tomato sandwich with marmalade and black pepper
makes one delicious lunch

two slices fresh wholegrain bread
1 garlic clove (keep whole)
3 slices tomato
a few slices of your favourite aged cheddar cheese (aged cheese has
the tangy flavour you need)
2 tsp orange marmalade
1/2 tsp dried rosemary
1 tsp freshly cracked pepper

Place slices in toaster to toast. Take out and while still warm rub the garlic clove over each slice (gently so that you just get a hint of garlic). Next place slices of tomato and cheese on pieces of toast.  Drizzle with marmalade and sprinkle with dried rosemary and fresh pepper. Place pieces of toast together and microwave for 30 seconds or until just melted. If you don't have a microwave or don't use one - warm up the sandwich in a hot oven for a few minutes or until cheese is melted.  Enjoy!

Coffee & cookies


You know that time around 3pm when you hit that afternoon slump, can’t keep your eyes open but still have lots more work to do? At that time I need either caffeine or sugar (or both).
Yes, I know that caffeine and sugar aren’t the healthiest options for sustenance. But my oatmeal cookies are not all that sweet, and they do a great job satisfying afternoon cravings and giving you a little boost of energy.
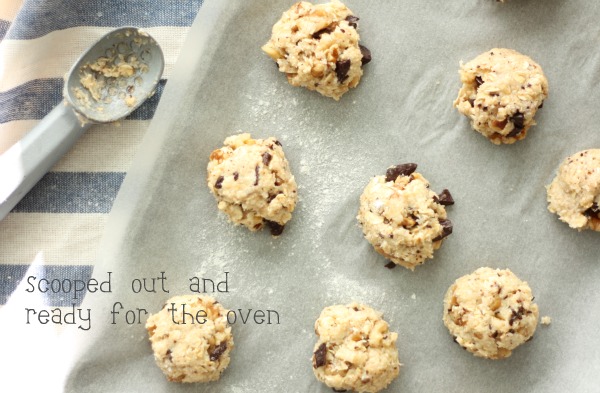
My oatmeal cookies use wholegrain rolled oats, coconut, walnuts and of course, smooth, rich and anti-oxidant packed dark chocolate.  Once the batter was made, I used an ice cream scoop to make small little imperfect balls, pressed them down a little and baked for 10-15 minutes. Easy to make and delicious to eat – the perfect afternoon treat (with your coffee!).


oatmeal-coconut-walnut cookies
makes about 15 fat cookies

1/4  cup canola oil
1 egg
1 tsp vanilla extract
2 tbsp soy milk
1/4  raw sugar
1 cup desiccated coconut
1 cup wholegrain oats
1/2 cup plain flour
1 tsp baking powder
pinch sea salt
1/4 cup walnuts, roughly chopped
1/4 cup dark chocolate, chopped

Preheat oven to 180 degrees C.
In a large bowl add oil, egg, vanilla, soy milk and sugar and mix until well incorporated.  In a separate bowl mix coconut, oats, flour, salt and baking powder.  Mix dry ingredients into wet ingredients and stir through walnuts and chocolate. Using an ice cream scooper or large spoon make little balls and place onto lined baking tray. Bake 10-15 minutes or until just golden. Enjoy with your afternoon coffee!


Cheese is what you need


It has been raining every day in Sydney.  Cheesecake is the kind of comfort you need on rainy days or when the weather is cold.
I love the creamy, smooth quality of the cheese against the crunch of the biscuit base and the sweet aftertaste. You don’t need a lot of sugar in cheesecake – somehow its richness is satisfying enough.
Sweet, creamy, tangy and refreshing – are some of the words that come to mind after tasting my baked citrus cheesecake. I used the zest and juice of lemon in the cake and served it with fresh mandarins. I kept the cake simple so that the freshness of ingredients would stand out; fresh ricotta, cream cheese, eggslemon and agave made up the body of the cake and I used wholemeal biscuits for the base.
My baked citrus cheesecake was super easy to make so I hope you try it out for yourself!
And for more cheesecake type recipes see here and here.


baked citrus cheesecake
serves 6-8

crust
125g/12 biscuits wholemeal biscuits (you could also use graham crackers, granita)
1 1/2  tbsp melted butter

filling
250g or 1 1/2 cups cream cheese (package)
250g fresh ricotta cheese
3 eggs – 2 whole and 1 yolk
zest from 1 lemon, juice from half
2 tbsp dark agave syrup (use honey or other sweetner if you don’t have it)
1 tbsp demerara sugar for sprinkling

Preheat oven to 170 degrees C.
Line the bottom of a 20cm springform pan with baking paper.
To make the crust, place biscuits in a processor and process until biscuits resemble sand-like texture. Place into bowl with melted butter and mix through. Place mixture into pan and press down.  Bake 5 minutes or until golden and take out to let cool.
To make filling: in a processor or with a beater mix both cheeses until softened, add in eggs one at a time, zest of lemon and juice, and agave syrup. Beat until everything becomes smooth . To get a dense and rich cheesecake make sure not to beat too much air into mix – it will just end up flopping in the centre. Once the filling is smooth, pour into pan on top of crust and sprinkle with demerara sugar (I do this to get a little bruléed crust). Cover pan with foil and place into centre shelf to bake* for 45 minutes – remove foil and bake another 15 minutes or until centre is firm.  Once baked, take out and let cool – refrigerate for a few hours – if you can wait! To serve, add mandarins or any other citrus fruit – pour over more agave syrup or use jam to add more sweetness. Enjoy!

*These are baking guidelines since ovens do vary – just make sure to keep an eye on the cake checking every 20 minutes or so.


My chocolatey cure


How can chocolate be so comforting? Its sweet, dark richness never fails to help me when I need to feel better, and I love finding ways to cook, bake and eat chocolate in new ways.
Molten lava cake, otherwise known as chocolate fondant, is one of the simplest and most satisfying chocolate desserts. It is a little bit like a flourless chocolate cake in that it has a similar moist and gooey interior, but it isn’t flourless.
It's made with just a few basic ingredients like chocolate (dark and good quality), butter, sugar, eggs and a little flour. I added some vanilla and a bit of espresso just for a change and an extra kick of caffeine.
These are my delicious little cakes – try them out for yourself, especially on a bad day and I promise you’ll feel better!

chocolate espresso molten cakes
makes two little cakes
*use organic where possible

60g dark chocolate – I used half 85%, half  70%
1 1/2 tbsp butter
1 tsp vanilla extract
1 tsp espresso powder
2 eggs
1 1/2  tbsp confectionary sugar
2 tbsp plain flour, sifted

Preheat oven to 220 degrees C.
In a double boiler (bain marie) melt chocolate pieces and butter. Take off heat once melted and let cool a little and mix in espresso powder and vanilla.  Prepare two ramekins; grease with butter and dust with flour. In a mixing bowl, add eggs and sugar and beat until fluffy and a little pale in colour – about 3-5 minutes. Gently add in chocolate mix, stir carefully until combined and then fold in sifted flour, one spoon at a time. Pour into ramekins and bake for about 7-9 minutes – watching/checking that outside is cooked but inside still moist and gooey.  Remove and let cool a little before tipping out onto dish. Finish with a dust of cocoa powder and serve with espresso or cappuccino or anything else delicious!
nb: my cakes weren’t as gooey on the inside as I would have liked – I probably left them in the hot ramekins a little too long.