It's amazing that just a few ingredients can create such a delicious treat. Banana bread is one of those baking staples for when you are lacking time or patience. It's not just easy to put together but even when you mess up the recipe a little it often still turns out wonderful and moist!
***
This recipe combines the sweet and creamy textures of overripe bananas (there are many in this recipe - I've used 4!), wholemeal and plain flour, olive oil (yes, I bake with this!) eggs and a touch of brown sugar. The perfect accompaniment to your morning or afternoon tea. Enjoy!
banana bread
makes 1 loaf
4 medium ripe bananas, mashed
1/4 cup olive oil
1/4 brown sugar
2 whole eggs
1 cup wholemeal flour
1/2 cup plain flour
pinch sea salt
1 tsp baking soda
Preheat oven to 170 degrees C.
Grease a loaf tin.
In a large bowl mix together bananas, olive oil, sugar and eggs. In a separate bowl, mix together dry ingredients: wholemeal and plain flour, salt and baking soda. Add dry ingredients to wet ingredients and mix - don't overmix! Place batter in loaf tin and bake on middle rack for about 40-45 minutes or until a knife inserted comes out clean. Take out of oven and lest rest before slicing
Showing posts with label dessert. Show all posts
Bent on brownies
Delicious. Chocolate. Brownies. It doesn't take much to appreciate the sweet, rich density offered by a bite of brownie.
***
These days I've been eating a lot of chocolate. It's been Easter and therefore almost impossible to ignore all the stands of chocolate treats set up absolutely everywhere!
If you're going to eat chocolate you might as well find another way to eat it -- for example, in a brownie! These ones are simple -- no intrusions, no additions like nuts -- just simple, unadulterated chocolate brownies. I used a combination of dark and milk chocolate, brown sugar and plain flour. Too easy and seriously delicious!
chocolate brownies
makes 12 squares
175g good quality chocolate (150g dark, 25g milk), chopped
130g butter, chopped
120g brown sugar
pinch of salt
2 whole eggs, room temperature
75g plain flour
Preheat oven to 165 degrees C.
Line a square or rectangular tin with baking paper. Place chocolate and butter in a bowl and place over a pot of simmering water just until melted. Take off the heat and keep aside to let cool slightly. In a separate bowl place sugar and salt. Add chocolate butter mixture to sugar and salt and mix. Add eggs one at a time until fully incorporated. Finally mix in flour well - ensuring not over mix batter. Pour batter into tin and bake approximately 25 minutes or until skewer inserted comes out clean. Take out of oven and let cool before slicing.
***
These days I've been eating a lot of chocolate. It's been Easter and therefore almost impossible to ignore all the stands of chocolate treats set up absolutely everywhere!
If you're going to eat chocolate you might as well find another way to eat it -- for example, in a brownie! These ones are simple -- no intrusions, no additions like nuts -- just simple, unadulterated chocolate brownies. I used a combination of dark and milk chocolate, brown sugar and plain flour. Too easy and seriously delicious!
chocolate brownies
makes 12 squares
175g good quality chocolate (150g dark, 25g milk), chopped
130g butter, chopped
120g brown sugar
pinch of salt
2 whole eggs, room temperature
75g plain flour
Preheat oven to 165 degrees C.
Line a square or rectangular tin with baking paper. Place chocolate and butter in a bowl and place over a pot of simmering water just until melted. Take off the heat and keep aside to let cool slightly. In a separate bowl place sugar and salt. Add chocolate butter mixture to sugar and salt and mix. Add eggs one at a time until fully incorporated. Finally mix in flour well - ensuring not over mix batter. Pour batter into tin and bake approximately 25 minutes or until skewer inserted comes out clean. Take out of oven and let cool before slicing.
Pleasantly plum-filled.
Autumn is here in Sydney. I actually cannot believe that summer flew by so quickly - even though it was definitely not the warmest, sunniest summer I've experienced here. In fact it's been rainy and cloudy a lot!
***
The fall is quite lovely and its cooler evenings mean that certain deliciously hearty and pastry-rich items feature back on the house menu.
Given the buckets of plums being showcased in markets at the moment, I thought a plum tart would be great idea for dessert. Mixing sweet yet tart plums with smooth and nutty marzipan makes for a wonderful tart combination.
Baked until sticky and golden, oozing with almond goodness and encased in a buttery crust - this is definitely dessert time!
plum & marzipan tarts
makes 4 tarts
pastry
175g plain flour
80g butter, cold and cut into pieces
pinch of sea salt
1 tsp caster sugar
1 egg yolk (keep white aside)
1/4 cup cold water (you won't need it all)
filling
5-6 small plums, sliced
50g marzipan, cut into pieces
1/4 cup brown sugar
squeeze of lemon juice
1/2 tsp cinnamon
4 tsp honey
Preheat oven to 180 degrees C.
To make the pastry: Sift dry ingredients into a bowl - using hands rub pieces of butter into the flour until mixture resembles sand. Mix in egg yolk and then bring mixture together by adding a bit of cold water (a little at a time) until it forms a ball. Wrap pastry in cling wrap and place in fridge 20-30 minutes.
To make filling: mix plums, sugar, lemon juice and cinnamon together. Keep aside.
Take out pastry and with rolling pin roll out until about 1/4 inch thick. Cut into appropriate sizes for tart cases (I used 15cm tart cases) and place into case carefully, pushing in all edges. Place into fridge 20 minutes. Take out lined cases, dock pastry and blind bake with beans/rice in oven for 10 minutes. Take out and let cool. Add pieces of marzipan to each case and add plum mixture, top each case with tsp of honey. Bake in oven about 45-50 minutes or until golden and plums are soft. Take out and let cool. Serve with cream or vanilla ice cream. Enjoy!
***
The fall is quite lovely and its cooler evenings mean that certain deliciously hearty and pastry-rich items feature back on the house menu.
Given the buckets of plums being showcased in markets at the moment, I thought a plum tart would be great idea for dessert. Mixing sweet yet tart plums with smooth and nutty marzipan makes for a wonderful tart combination.
Baked until sticky and golden, oozing with almond goodness and encased in a buttery crust - this is definitely dessert time!
plum & marzipan tarts
makes 4 tarts
pastry
175g plain flour
80g butter, cold and cut into pieces
pinch of sea salt
1 tsp caster sugar
1 egg yolk (keep white aside)
1/4 cup cold water (you won't need it all)
filling
5-6 small plums, sliced
50g marzipan, cut into pieces
1/4 cup brown sugar
squeeze of lemon juice
1/2 tsp cinnamon
4 tsp honey
Preheat oven to 180 degrees C.
To make the pastry: Sift dry ingredients into a bowl - using hands rub pieces of butter into the flour until mixture resembles sand. Mix in egg yolk and then bring mixture together by adding a bit of cold water (a little at a time) until it forms a ball. Wrap pastry in cling wrap and place in fridge 20-30 minutes.
To make filling: mix plums, sugar, lemon juice and cinnamon together. Keep aside.
Take out pastry and with rolling pin roll out until about 1/4 inch thick. Cut into appropriate sizes for tart cases (I used 15cm tart cases) and place into case carefully, pushing in all edges. Place into fridge 20 minutes. Take out lined cases, dock pastry and blind bake with beans/rice in oven for 10 minutes. Take out and let cool. Add pieces of marzipan to each case and add plum mixture, top each case with tsp of honey. Bake in oven about 45-50 minutes or until golden and plums are soft. Take out and let cool. Serve with cream or vanilla ice cream. Enjoy!
Just so peachy.
It's golden, crumbly and slightly sweet -- a topping like no other. Underneath you find golden yellow peaches flecked with sweet crunchy specks of sugar and cut with a slight tang of blueberry flavour.
This is cobbler.
Such a simple but understated dessert. I've never made a cobbler before but I have made many crumbles. Quite similar desserts but a cobbler is more like a deconstructed pie -- and anything with a sweet buttery pastry like topping is ok by me.
So easy to make -- it requires just a few ingredients -- fruit, of course -- any stonefruit and berry combination works well. I used peaches and blueberries but you could try other pairings like plum and blackberries or strawberries and rhubarb...Easily tossed in lemon juice and sugar and topped with a simple mix of flour, oats, butter and demerara sugar.
Try it out and you will be pleased!
peach and blueberry cobbler
serves 4
(recipe adapted from Gourmet)
mix
4 large peaches (or 5-6 small)
1 cup blueberries
1/4 lemon, juiced
1 tbsp demerara sugar
1 tsp cornflour/cornstarch
topping
1/2 cup flour (I used wholemeal self-raising)
1/2 cup oats
1/4 cup demerara sugar
pinch sea salt
80g (about 3/4 stick) cold butter, cut into pieces
1/4 cup boiling water
Preheat oven to 210 degrees C.
In a large bowl mix peaches, blueberries, lemon juice, sugar and cornstarch. Place fruit mixture into a baking dish (I used a pie dish).
To make the topping: In a bowl combine flour, oats, sugar and salt and then rub in cold butter pieces with hands until mixture forms a crumbly like texture like sand -- leaving some lumps is ok. Stir in hot water a little at a time until mixture just combines, don't overmix. Drop spoonfools of topping over fruit mixture and bake in the oven for about 25 minutes or until topping is golden brown. Note: I didn't pre-cook my fruit as I wanted it to have some texture and not be too soft.
Another cheesy cheesecake
If you’re a regular visitor to my blog then this post on yet another cheesy baked item won’t be a surprise. We love cheesecake. When I say ‘we’ I mean my husband M and I -- cheesecake is one of our favourite desserts.
Labels:
almonds,
baked,
biscuits,
cheesecake,
dessert,
ginger,
raspberries,
sour cream
Baked and bruised
Pastry making is an art that I never really had an interest in until I went to cooking school. It's there that I learned to make different types of pastry – sweet, savoury and the famously scary puff. Of course the perfectionist in me wanted to do the best job I could. Well, it turns out I can’t make a very good puff pastry – but I find it comforting to know that many great chefs have shared that they can’t either. Thank goodness.
Labels:
apples,
blueberries,
dessert,
galette,
puff pastry,
sugar,
tart
A magical mousse
Did someone say chocolate? Yes, but not just any chocolate – dark, rich and creamy and smooth chocolate mousse. I apologize for the delayed first post of the month. I’ve been feeling a bit stuck -- it's that time of year where I have to re-think life and work, and torture myself with deep and existential questions.
Labels:
cream cheese,
dark chocolate,
dessert,
honey,
mousse,
rich
Brownies please
Like the rest of those foodies out there I love everything about food – searching through stores and markets for the best produce, talking about food, eating it and of course cooking and baking. When I’m in my kitchen with the ingredients I love I’m a happy person; conceptualizing a dish from start to finish and then working to create it is not only stress-relieving but also a wonderful creative outlet.
Labels:
baked,
brownies,
cheesecake,
dark chocolate,
dessert
Z is for zucchini
I was given a few zucchinis the other day and wondered what I could make with this beautifully fresh and green vegetable. I love the taste and texture of raw sliced zucchini in my salads or alternatively in stick form with a delicious dip of hummus. I don’t really love the cooked version – sorry ratatouille lovers (I did love the film though!)
I need cake
A bad week – ups and downs and everything in between – calls for some cake. As life moves on we get busy and forget to take a moment to stop and relax and just be still. Stillness requires food of course – and what better food than cake.
Cherries on top
Cherries are such a beautiful fruit – small, almost berry–like, dark and sweet, the perfect pick-and-eat fruit. Cherry trees are also some of the most prettiest trees out there – their blossoms so gorgeous and pink. I have many childhood memories of having kind of overdosed on fruit - sitting under cherry trees in friends' backyards, happily eating way too many cherries.
Coffee & cookies
You know that time around 3pm when you hit that afternoon slump, can’t keep your eyes open but still have lots more work to do? At that time I need either caffeine or sugar (or both).
Yes, I know that caffeine and sugar aren’t the healthiest options for sustenance. But my oatmeal cookies are not all that sweet, and they do a great job satisfying afternoon cravings and giving you a little boost of energy.
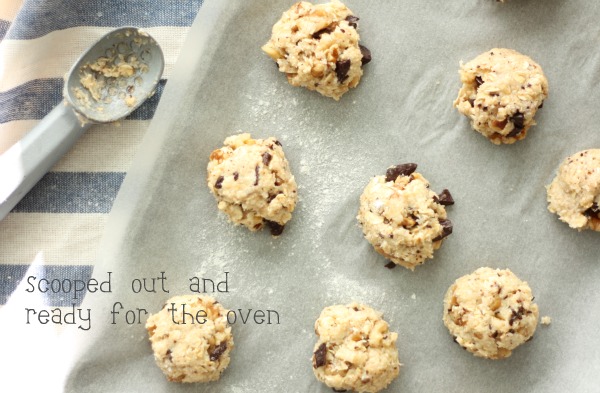
My oatmeal cookies use wholegrain rolled oats, coconut, walnuts and of course, smooth, rich and anti-oxidant packed dark chocolate. Once the batter was made, I used an ice cream scoop to make small little imperfect balls, pressed them down a little and baked for 10-15 minutes. Easy to make and delicious to eat – the perfect afternoon treat (with your coffee!).
oatmeal-coconut-walnut cookies
makes about 15 fat cookies
1/4 cup canola oil
1 egg
1 tsp vanilla extract
2 tbsp soy milk
1/4 raw sugar
1 cup desiccated coconut
1 cup wholegrain oats
1/2 cup plain flour
1 tsp baking powder
pinch sea salt
1/4 cup walnuts, roughly chopped
1/4 cup dark chocolate, chopped
Preheat oven to 180 degrees C.
In a large bowl add oil, egg, vanilla, soy milk and sugar and mix until well incorporated. In a separate bowl mix coconut, oats, flour, salt and baking powder. Mix dry ingredients into wet ingredients and stir through walnuts and chocolate. Using an ice cream scooper or large spoon make little balls and place onto lined baking tray. Bake 10-15 minutes or until just golden. Enjoy with your afternoon coffee!
Cheese is what you need
It has been raining every day in Sydney. Cheesecake is the kind of comfort you need on rainy days or when the weather is cold.
I love the creamy, smooth quality of the cheese against the crunch of the biscuit base and the sweet aftertaste. You don’t need a lot of sugar in cheesecake – somehow its richness is satisfying enough.
Sweet, creamy, tangy and refreshing – are some of the words that come to mind after tasting my baked citrus cheesecake. I used the zest and juice of lemon in the cake and served it with fresh mandarins. I kept the cake simple so that the freshness of ingredients would stand out; fresh ricotta, cream cheese, eggs, lemon and agave made up the body of the cake and I used wholemeal biscuits for the base.
My baked citrus cheesecake was super easy to make so I hope you try it out for yourself!
baked citrus cheesecake
serves 6-8
crust
125g/12 biscuits wholemeal biscuits (you could also use graham crackers, granita)
1 1/2 tbsp melted butter
filling
250g or 1 1/2 cups cream cheese (package)
250g fresh ricotta cheese
3 eggs – 2 whole and 1 yolk
zest from 1 lemon, juice from half
2 tbsp dark agave syrup (use honey or other sweetner if you don’t have it)
1 tbsp demerara sugar for sprinkling
Preheat oven to 170 degrees C.
Line the bottom of a 20cm springform pan with baking paper.
To make the crust, place biscuits in a processor and process until biscuits resemble sand-like texture. Place into bowl with melted butter and mix through. Place mixture into pan and press down. Bake 5 minutes or until golden and take out to let cool.
To make filling: in a processor or with a beater mix both cheeses until softened, add in eggs one at a time, zest of lemon and juice, and agave syrup. Beat until everything becomes smooth . To get a dense and rich cheesecake make sure not to beat too much air into mix – it will just end up flopping in the centre. Once the filling is smooth, pour into pan on top of crust and sprinkle with demerara sugar (I do this to get a little bruléed crust). Cover pan with foil and place into centre shelf to bake* for 45 minutes – remove foil and bake another 15 minutes or until centre is firm. Once baked, take out and let cool – refrigerate for a few hours – if you can wait! To serve, add mandarins or any other citrus fruit – pour over more agave syrup or use jam to add more sweetness. Enjoy!
*These are baking guidelines since ovens do vary – just make sure to keep an eye on the cake checking every 20 minutes or so.
Labels:
cheesecake,
cream cheese,
dessert,
lemons,
ricotta
My chocolatey cure
How can chocolate be so comforting? Its sweet, dark richness never fails to help me when I need to feel better, and I love finding ways to cook, bake and eat chocolate in new ways.
Molten lava cake, otherwise known as chocolate fondant, is one of the simplest and most satisfying chocolate desserts. It is a little bit like a flourless chocolate cake in that it has a similar moist and gooey interior, but it isn’t flourless.

It's made with just a few basic ingredients like chocolate (dark and good quality), butter, sugar, eggs and a little flour. I added some vanilla and a bit of espresso just for a change and an extra kick of caffeine.
These are my delicious little cakes – try them out for yourself, especially on a bad day and I promise you’ll feel better!
chocolate espresso molten cakes
makes two little cakes
*use organic where possible
60g dark chocolate – I used half 85%, half 70%
1 1/2 tbsp butter
1 tsp vanilla extract
1 tsp espresso powder
2 eggs
1 1/2 tbsp confectionary sugar
2 tbsp plain flour, sifted
Preheat oven to 220 degrees C.
In a double boiler (bain marie) melt chocolate pieces and butter. Take off heat once melted and let cool a little and mix in espresso powder and vanilla. Prepare two ramekins; grease with butter and dust with flour. In a mixing bowl, add eggs and sugar and beat until fluffy and a little pale in colour – about 3-5 minutes. Gently add in chocolate mix, stir carefully until combined and then fold in sifted flour, one spoon at a time. Pour into ramekins and bake for about 7-9 minutes – watching/checking that outside is cooked but inside still moist and gooey. Remove and let cool a little before tipping out onto dish. Finish with a dust of cocoa powder and serve with espresso or cappuccino or anything else delicious!
nb: my cakes weren’t as gooey on the inside as I would have liked – I probably left them in the hot ramekins a little too long.
Flavourful flakiness
When I was little my sister and I frequented a convenience store nearby our house. The store was a kids' dream – full of an endless variety of candy. While I would often go for hard, sugary candies like 'gobstoppers', my sister typically went for a yummy pastry filled with jam and cream, aptly named ‘passion flakie’.
Over time I have also come to appreciate creamy, flaky pastry items. While I do sometimes crave the trashy flavours of a store-bought, plastic-wrapped dessert, most often I decide to recreate a fresh, somewhat healthier version at home.
So here it is – my version of the passion flakie. I used fresh rhubarb to make a rhubarb, ginger and raspberry compote for a much more adult and classy version of this dessert. I made a cream cheese filling; sweet, creamy and vanilla-flecked. I used puff pastry – store-bought because I didn’t have the time or energy to make puff pastry and well, I just don’t make it as beautifully as I would like to. Once assembled together, these delicious little puffs of cream and sweet-sourness were devoured by my husband – just a few left!
rhubarb, raspberry and ginger cream puffs
makes about 10 little puffs – depending on how generously you fill them!
puff
1 package puff pastry
flour for dusting
icing sugar for sprinkling
compote
300g rhubarb, cut into 2 inch pieces
100g raspberries – frozen is fine
1/2 tsp grated fresh ginger
250ml water
30g raw sugar
2 inch piece lemon peel
1/2 vanilla bean
cream cheese
125g low fat cream cheese
1tbsp thickened cream
1 tbsp dark agave syrup
juice of a lemon wedge
Preheat oven to 220 degrees C
For the pastry: dust surface with flour and roll out pastry. Using a cookie cutter, cut out 8cm circles and place onto baking sheet lined with baking paper. Place tray of pastry in fridge while prepping other ingredients.
For compote: place all ingredients except raspberries into pot and cook on medium heat for 5 minutes or until rhubarb is just soft. Take out rhubarb and add raspberries. Cook until thickened and raspberries have broken down. Add rhubarb back into pot and adjust for sweetness. Take off heat and let cool.
For cream cheese filling: bring cream cheese to room temperature, mix with other ingredients and place into fridge until ready to assemble.
Dust pastry with icing sugar and place into hot oven. Bake 5-6 minutes or until golden. Take out, let cool and slice through the middle to create two halves. Assemble the puffs, first with a layer of cream and then compote, add the top layer and dust generously with icing sugar. Enjoy!
Labels:
compote,
cream cheese,
dessert,
ginger,
puff pastry,
raspberry,
rhubarb
Cold and creamy cups of custard

magical treat.
My custardly creation is based on a traditional crème caramel making process: I use a base of brown sugar caramel and then add a mix of delicious coconut cream, milk, eggs, dark agave syrup and lime zest. I bake my little pots of creamy goodness and then place them in the fridge to get a wonderfully wobbly but firm texture.
baked coconut custards with lime
serves 6
*use organic where possible
1/3 cup brown sugar
3 eggs
pinch sea salt
270 ml coconut cream
200 ml low fat milk (any kind will do)
2 tbsp dark agave syrup (or a similarly sweet sweetner)
zest of 1 lime
Preheat oven to 180 degrees C
Add brown sugar to a small pot on medium heat and let caramelize. Pour caramel into 6 ramekins and ensure it covers the bottom. In a separate large bowl, beat 3 eggs, add coconut cream, milk, salt, and agave syrup and lime zest and mix well. Divide mix between ramekins and place into roasting tray – fill with 1inch of hot water (to create a water bath) and place into oven*. Bake for 40-45 minutes or until set. Let cool and place into fridge. To serve carefully tip out custards onto plate. Yum!
*note – I covered the custards with foil for half the baking time – if you don’t want any colour on the top, make sure to cover the whole time.
Tapioca temptation
Tapioca needs a new image. Considered to be one of those old-fashioned, plain and boring items, tapioca is one of those desserts that all too often appears in hospital food. But these wonderful, chewy pearls are so much more exciting thank you think. They have serious potential.
A number of cultures use tapioca – a starch that comes from the cassava root – in their cooking and baking. Growing up in my Indian home, we used tapioca to make payasam. A milk (cow’s or coconut) based dessert, sweetened with sugar or jaggery (a dark sugar byproduct that tastes like molasses) and spiced with saffron and cardamom, payasam is an Indian dessert staple. There are a number of different versions of payasam, depending on which ingredients you select from a long list that includes rice, lentils, semolina, raisins, and almonds.
For my tapioca image overhaul, I decided to use one of my favourite flavours: coconut. I cooked the tapioca in water and separately made a liquid mix of coconut milk and coconut sugar, vanilla and a pinch of cardamom. I served this rich, coconut infused pudding with raspberries and flaked almonds - simple and delicious!
coconut tapioca with vanilla and raspberries
serves 4
1/2 cup tapioca pearls
4 cups water
1 1/2 cups coconut milk
2 tbsp coconut sugar (or alternative sweetner)
2 tsp vanilla extract
pinch cardamom
Bring a pot with water to boil, add in tapioca pearls and cook while stirring – about 10-12 minutes until almost transparent. Strain and keep aside. In another pot, add coconut milk, coconut sugar, vanilla and cardamom and mix well on medium heat. Add cooked tapioca and cook a few more minutes (adjust for taste and thickness). Take off heat and keep aside to cool down. I like to refrigerate my tapioca for a few hours to let the flavours infuse and to ensure the pearls increase in volume, which adds to the creaminess of the dish.
If using raspberries, add a bit of sugar and mix to form a delicious sweet liquid and add to tapioca and finish with almonds. Enjoy!
Labels:
almonds,
coconut,
dessert,
raspberries,
tapioca pudding
A little foodie photography project
Dear friends I have something excitng to share with you. A little while ago, my new blogger friend Aurelie at Pause Gourmande (a lovely French blog) asked me to participate in an interesting blogger project. She was going to put together an online magazine and asked me to share a few photos and recipes.
***
Here is the link to the magazine’s spring issue. I think it looks great and that Aurelie did a fantastic job of turning this project into a beautiful magazine. I love the compositon of her photographs and the light and subject is always gorgeous.
***
The magazine and all the recipes (spiced chocolate date cakes and red wine braised lentils) are in French. I adore the French language and encourage you to try my recipes out! For those who don't read French – no worries – I’ve posted everything about the recipes below…
A common dessert here in Australia is sticky date pudding – a velvety rich date cake topped with a buttery rich caramel sauce. Not that I don’t love indulging in creamy, heavy desserts (they definitely have a place in my kitchen!), but the warm and sunny weather here often inspires me to make something lighter yet still rich and generous. These spiced chocolate cakes are moist and have a great natural sweetness provided by the dried dates. I use warming and fragrant spices like cinnamon, cardamom and ginger to add a kick to the subtle flavours of dark chocolate. This may sound a little heavy but these little bundt cakes require only a small amount of flour, which makes them moist, light and airy - just perfect for a lovely sunny day! Once cooked and cooled I keep them in the fridge because I love the texture of a cooled spongy cake. You can serve the cakes on their own, dusted with cocoa or with some vanilla whipped cream and/or ice cream. Try making them and you won’t be disappointed.
recipe makes 4 smallish bundt cakes
*use organic ingredients where possible
180g dates (pitted)
280 ml water
1 tsp baking soda
60g dark chocolate – broken into small pieces
60 g butter, softened
20g raw sugar
2 eggs
100g self raising flour (if using plain flour make sure to add baking powder as a raising agent)
1 tsp ground cinnamon
1 tsp ground ginger
½ tsp ground cardamom
pinch sea salt
Preheat oven to 160 degrees Celsius.
Place a small pot with dates and water on medium heat and bring to the boil. Once at boiling point, turn off the heat, add baking soda and let sit 10 minutes to cool – then blend mixture until reaches puréed consistency and stir in chocolate pieces. In the meantime, in a separate bowl beat butter and sugar until creamy, add in eggs one at a time until well incorporated. Add date mixture to bowl and stir well. Sift in flour, ground spices and pinch of sea salt. Pour thick batter into greased bundt moulds and bake on centre shelf in oven 30-40 minutes until knife inserted comes out clean. Take out and let cool on racks. To finish dust cakes with dark cocoa powder and enjoy.
Lentils are a common dish at my house – they are not only inexpensive but they are also wonderfully versatile and can carry lots of different flavours. A lot of Indian cooking is based on the use of lentils: it not only adds protein and heartiness to vegetarian dishes but also thickens soups and sauces. There are many varieties of lentils but one of my favourites (which actually isn't that common in Indian cooking) is the Puy lentil or French green lentil. Since puy lentils hold their shape during cooking, they keep their lovely toothsome texture. The small little discs of speckled green lentils are not only useful for salad type dishes but they are also beautiful to serve on a plate. The flavours in this dish aren’t complicated – I sautéed onions, garlic and carrots, deglazed with red wine, used lots of fresh herbs like bay leaf, rosemary, thyme and basil and finished it with a splash of balsamic vinegar for an added richness and sweet tang. I served my lentils with sautéed chicory greens and pan fried halloumi cheese.
red wine braised lentils with fresh herbs
recipe serves 4
1-2 tbsp olive oil
½ red onion, finely chopped
1 carrot, peeled and finely chopped
2 garlic cloves, finely chopped
3 fresh bay leaves
1 sprig rosemary
1 sprig thyme
1 cup Puy lentils, rinsed
½ cup red wine (I used a full bodied wine like Cabernet Sauvignon)
3 cups water or stock
sea salt and cracked black pepper
1-2 tbsp balsamic vinegar
1 cup fresh cherry tomatoes
sprinkle of dried chili
Place a Dutch oven or sauté pan with high edges on medium heat. Once pan is hot, add oil and onions, carrots and garlic to sauté for 5 minutes. Add bay leaves, rosemary, thyme and lentils – stir for a few minutes. Add red wine to deglaze pan and cook off alcohol – about 1-2 minutes. Add 3 cups of water or stock and simmer until lentils are just cooked about 20-25 minutes. Make sure to add more water if needed to finish cooking lentils. Season lentils well with sea salt and pepper, add balsamic vinegar and stir 1-2 more minutes. Once off the heat, add a little extra virgin olive oil and stir through fresh cherry tomatoes and a sprinkle of dried chili.
Serve lentils on their own or with sautéed chicory and pan fried halloumi as I’ve done. Of course, this dish must be enjoyed with glass of delicious red wine.
Labels:
autumn,
blog project,
chocolate,
dates,
dessert,
puy lentils,
red wine,
spices
Prime time for pears
It’s autumn in Sydney. The change in season has brought rainy days but also a change in the produce available. The fruits of the summer – mangoes and berries – have been replaced by apples, peaches and pears. Pears are the least expensive fruit at the moment so I buy a lot of them. What do you do with a kitchen full of pears, you ask? Try poaching them.
For some, poached pears may conjure up bad memories of old-fashioned desserts - overcooked and mushy fruits drowning in far too much sugary syrup. But don’t be fooled: poached fruit can be a light alternative to heavy and creamy desserts and it can be a beautiful dish to impress friends with at dinner parties.
To add richness to an otherwise cheap dessert, use a delicious, dark red wine (a wine you would drink) and fresh, strongly scented spices like star anise, vanilla bean and whole green cardamom.
***
When in season pears are already very sweet so I just add some honey to bring out their flavour, which also gives the perfect stickiness factor to enrich the dark red winey syrup.
honey and wine spiced pears
serves 4
4 firm pears (use any type but I used Bartlett)
full bodied red wine* – use enough to cover pears (1/2 bottle or more)
1 tbsp organic honey
2 green cardamom pods – crushed
1 tsp ground cinnamon
1/2 vanilla bean – scraped
1 star anise
Peel pears and place into small pot. Cover pears with red wine (dilute with water if desired), add honey and spices. Place pot onto medium heat and simmer pears until just soft or a knife inserts easily into flesh. Once cooked, keep poaching liquid in pot, remove pears and keep aside. Reduce poaching liquid until thick and syrupy (make sure to watch as it can burn). Plate pears and pour a little syrup on top. I served these alone but you could also serve with gelato/ice cream and/or biscuits. Enjoy.
*if using all wine is too strong for your taste, add some water to dilute
Subscribe to:
Posts (Atom)