Fruits of the summer


I’m a big believer in breakfast. That old adage ‘eat breakfast like a king, lunch like a prince, and dinner like pauper’ is a great way to develop healthy eating habits. Of course, I make deliciously huge feasts for dinner sometimes, but I also make sure to eat in the morning.

The abundance of fruits this summer makes it easy to come up with lots of good fruit options for breakfast -- like strawberry mango smoothies, berry pancakes or French toast with peach compote. This morning I wanted to combine fruit with something slightly unusual.

A few years back one of my best friends and roommate at the time introduced me to brown rice in the morning -- not a common thing to eat in the morning but nevertheless delicious. Instead of the usual oatmeal, brown rice offers a unique take on standard porridge.
I cook the rice as I normally would and then add soy milk and lots of warm spices like ginger, cinnamon, cardamom and a little clove. For a touch of sweetness I add maple syrup (the real stuff -- no corn syrupy imitations please!).  In keeping with my ‘fruits of summer’ theme I add a bunch of berries, peaches and bananas, some flaked almonds and dried currants. I promise that mornings won’t be the same after this!


brown rice porridge
serves 2
½ cup brown rice – I use a long grain rice like basmati
star anise
soy milk – 1-2 cups
1 tsp each ground cinnamon, cardamom, ginger
¼ tsp ground clove
1 tbsp maple syrup
fresh fruits - strawberries, blackberries, peaches, nectarines - anything!
dried fruits like black currants

First, place water and star anise in a pot and bring to the boil.  Add rice and cook (takes approx. 25 mins). Drain and leave aside. In the same pot, add cooked rice and cover with soy milk – If you like your porridge more watery add more milk as you go along. Add spices and maple syrup and cook on a low heat so that the rice absorbs the flavour.  After 10-15 minutes your rice should be thick and creamy – taste and add more milk/maple syrup as needed.
Top porridge with fruits – both fresh and dried, and nuts.

Options: you could use frozen fruit if you don’t have access to fresh berries, figs, homemade jam/preserves
You could use any other type of milk – cow, almond, rice...


Spectacular spores


Mushrooms are an interesting ingredient. I often wonder how these strange and delicious fungi have come to be such a common, everyday item on our grocery list. There are many mushroom varieties – shitaki, oyster, button, portobello, chanterelle, pineforest, to name just a few. Since some mushroom varieties are poisonous, I can’t help but wonder about the number of people who risked their lives to try this marvelous fleshy substance…
For many vegetarians and vegans, mushrooms represent a hearty, meaty alternative but they are often overlooked as a stand-alone dish. They are unlike any vegetable in flavour and texture and you’ll find mushrooms to be a great carrier of both strong and gentle aromas. While there are a million ways to serve mushrooms, I love to sauté or bake them and dress them with mustard, olive oil, fresh herbs, garlic and lots of lemon. 
Since they are little sponges of flavour, never, ever wash your mushrooms as they will end up watery and tasteless. Simply brush off the dirt, slice and cook. I place them in a hot pan with the slight bit of oil – add salt and let their natural juices come out for them to cook in.


baked mushrooms
serves 2 (or 4 as appetizer)

12 baby portobello mushrooms
sea salt and black pepper
2 tbsp extra-virgin olive oil
2 tsp mustard – like French dijon
½ tsp dried chili
1 lemon, (use half for zest and all juice)
1 garlic clove – grated/minced
1 tbsp fresh parsley chopped

Preheat oven to 200 degrees C
In a bowl, mix extra-virgin olive oil, mustard, chili, lemon zest and juice, minced garlic and parsley.  Leave emulsion to sit aside while you prepare mushrooms. Brush dirt off mushrooms – slice into halves and sprinkle with salt and pepper. Bake mushrooms in oven for 5-8 minutes, take out and pour over lemon emulsion and bake for another 5 minutes or so. To serve, drizzle a little more extra-virgin olive oil on the mushrooms and serve with fresh crusty baguette.  Don’t forget a glass of wine! Enjoy.


Pumpkin 'pots du fromage'


Our holidays were spent visiting family and close friends in wintry cold Canada and US. Having been living in sunny Sydney for the last year and a half made the icy cold that much more of a serious shock to the system. But while I never, ever thought I would say this, I miss the Canadian cold. We walked around the city while it snowed, ate hearty and warming foods and it was incredibly cozy. I am a sucker for nostalgia it seems.
 
I wanted something that would remind me of hibernation-inducing winter desserts. So naturally I looked to the quintessential winter food (and one of the only winter foods in the store here in Sydney): pumpkins! I’ve used this fabulous squash before for my pumpkin tart recipe.  But given the heat I didn’t want to use my oven nor did I really want all the buttery richness of pastry, so I decided to make something light and fresh that would still remind me of my Canadian winter.
I decided on pumpkin pots de crème but found I had run out of cream and eggs. What I did have on hand was cream cheese and ricotta and so I made ‘pumpkin pots du fromage’ –- not an official name of a dessert but of course everything sounds better en français.
This is an easy dessert to make. You need only a few main ingredients – fresh pumpkin, vanilla extract, cream cheese, ricotta cheese, brown sugar. I used low fat cheeses to keep with the fresh-and-light theme (and because beachwear is unforgiving). The pumpkin is perfect for adding sweetness and body and the spices provide a unique taste. This dessert feels so much more indulgent than it is! See recipe below.

pumpkin pots du fromage
serves 3-4 small servings

400g pumpkin (I used kent but you could use butternut squash)
1 tsp vanilla extract
½ tsp each ground clove, ground cinnamon and ground nutmeg
3 tbsp low fat cream cheese
3 tbsp ricotta cheese
2 tbsp brown sugar
4 digestives biscuits or graham crackers


You can either roast the pumpkin whole with skin on for 30 mins at 180 degrees C or peel and cut into small pieces and steam for 10 minutes (keep aside a few small pieces for decoration). Pass soft pumpkin through sieve or place in food processor and puree. Once cooled add vanilla and spices, mix in cheeses and sugar. Place mix into pots and refrigerate. Just before serving add decorative pieces and crumbled biscuits.

For decoration: cut pumpkin into small cubes and cook in a little butter and maple syrup until cooked and caramelized.

A summery sunday supper


Every single morning I wake up and make myself a strong cup of coffee, usually spiced coffee (recipe here).  I seriously cannot function without a dose of caffeine but this morning I tried something different: I had a cup of green tea with lemon and a fruity smoothie  -- nothing greasy or rich in fat. This change is one attempt at trying to be healthier this year. I will try to eat more foods rich in anti-oxidants, omega 3 fatty acids, and other energy-giving nutrients.
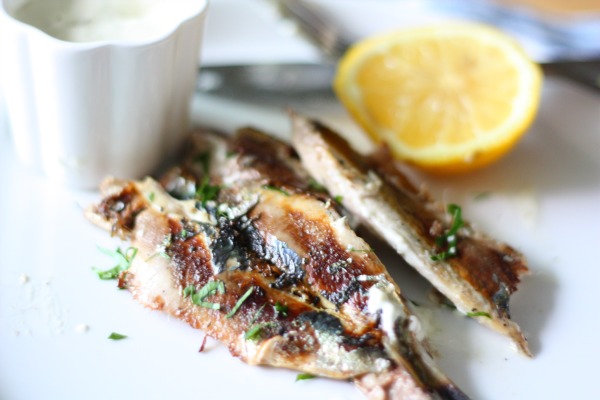
Seeing as I love fish and know that sardines are rich in minerals I though it would continue my healthier 2011 regime by making fish for supper. Sardines have a strong flavour that can carry intense aromatics like garlic and onions and fresh herbs like rosemary and parsley. They are small fish and have an oily texture which requires the use of citrus like lemons. Sardines are not only healthy and a great protein but they are really easy to grill or bake. Try out my recipe.


baked sardines with roast fingerling potatoes
serves 4

for fish
10 whole sardines – easy to clean or buy already cleaned and butterflied*
1 tbsp extra-virgin olive oil
1 lemon
½ bunch parsley chopped
1 sprig fresh rosemary – use dried if you don’t have fresh
4 cloves garlic
sea salt and black pepper

for potatoes
12 fingerling potatoes
1-2 tbsp extra-virgin olive oil
1 lemon - zest and juice
1 tsp sumac (a lemon scented spice used in middle eastern cuisine)
2 tsp lemon thyme
1 red chili deseeded and chopped
sea salt and black pepper to taste

Preheat oven to 220 degrees C

Cut potatoes in half lengthwise and place in oven safe dish –- make sure it’s large enough for the potatoes to be spread out.  Mix chopped herbs and spices with oil, lemon zest and juice, chili, salt and pepper and pour onto potatoes. Make sure to cover mix all over potatoes and place into oven. Bake for 20-30 mins.

In a separate oven tray lay out butterflied sardines. Use half the lemon for juice and cut the other half in slices. In a small bowl, mix olive oil, herbs, salt, pepper and juice from half the lemon. Pour mix over sardines and dot with lemon slices. Leave to marinate in fridge 10-15 minutes. Take out and place into oven for the last 10 minutes of potato cooking time.

Serve with fresh greens and aioli* -- enjoy.

*to butterfly fish means to lay out flat and remove bones – if too daunting a task just buy sardines cleaned and cook whole – the recipe will still work!
*you can either make aioli (like a mayonnaise) or buy it from a gourmet deli

For dessert?


I think almost every food blog out there has a post on brownies. I’ve tried out a number of different recipes using a variety of ingredients, even using beets (really good recipe, stay tuned for future post). While most recipes call for butter, I often substitute oil. There is a difference of course and it depends on what texture, feel and taste you’re looking for.
Now, this may seem strange, but I use olive oil. There is a debate about using olive oil in baking as it has a strong flavour, but my philosophy is that using several strong flavours can work really well and prevent any one taste from overwhelming the palate. So if you plan on using olive oil in baking, simply also use spices and/or more grainy tasting flour. Of course, olive oil isn’t the best choice for all recipes – for example, in my carrot cake recipe I used neutral tasting canola oil – but it does complement certain flavours.
For these brownies I added toasted hazelnuts and one teaspoon of cayenne powder – another ingredient I love. The little bit of heat imparted by the chili paired well with the rich dark chocolate and the crunchy hazelnuts. The tastes reminded me of nutella (but more like a nutella party in your mouth). I also happened to have some leftover strawberries and decided to make a compote to go with the brownies.
Compotes sound complicated but they are basically made either by macerating fruits in sugar and liquid (alcohol/water) or by cooking gently until thick and syrupy (that’s all I did!). I whipped some fresh cream and folded in some compote. Try it out and I promise you won’t be able to eat just one.
olive oil brownies
makes 15 pieces
adapted from a recipe posted on spoonfulblog

100g dark chocolate (I used 85%)
1/4 cup fruity extra virgin olive oil
2 organic eggs
1/2 cup raw sugar
1 tsp vanilla extract
1/4 cup milk (can use any type)
1/2 cup organic plain flour
1/4 sea salt
1/4 tsp cayenne pepper
2/3 cup toasted hazelnuts

Preheat oven to 175 degrees C/350 degrees F
Prepare the tin - I greased a rectangular pan and lined it with baking paper

To melt the chocolate: place bowl of chocolate over pot of simmering water (don't let the bowl touch the water). Once melted, remove from heat and add olive oil - mix and leave aside to cool.
Next, toast hazelnuts in oven for 5-6 minutes, take out and remove skins. Chop roughly and leave aside.

For the brownies: beat sugar and eggs together until light and fluffy (about 5 minutes), add in vanilla extract and milk and fold in cooled chocolate mixture.  In a separate bowl, mix flour, salt and cayenne powder. Fold in dry ingredients to wet ingredients and then fold in chopped hazelnuts.

The batter should be thick and not too wet. Place batter into prepared tin and bake 15-20 minutes. Remove and cut into squares. You can keep in fridge up to one week. Enjoy.

Spanish flavour


As a celebration of the one beautiful day of summer we’ve had so far I wanted to make something special for dinner. Given the heat, the dish had to be light and fresh, but still full of flavour. That’s when I remembered a recipe for an Andalusian gazpacho (take from Skye Gyngell’s recipe found here). I substituted the more special ingredients (marcona almonds and aged sherry vinegar) with natural almonds and red wine vinegar.
I often use bread to thicken the gazpacho (try something crusty like a ciabiatta and then soak it in water to make it soft and spongy). But this time I happened to see fresh green almonds being sold at the grocer and thought it would be great to use them as a garnish for my soup. Using nuts in cooking is often a great idea. Nuts are a healthy way to thicken up sauces and soups - for example, a lot of vegetarian Indian dishes use cashews, peanuts and almonds to create creaminess and add protein.
The soup was crunchy, sweet and tangy. Just perfect with a glass of white wine and some fresh crusty bread. The perfect – and first – summer evening.


spanish gazpacho soup
Serves 6 (or 4 with leftovers)

2 kg (4lbs) Tomatoes – vine ripened are the best –
1 red chili, deseeded
1 red onion
2 red peppers, deseeded
1 large english cucumber, deseeded
1 clove garlic (if you’re afraid of raw garlic you can blanch it first)
1 bunch fresh basil
1 handful of lightly toasted almonds (I used natural but you can use marcona if you can find them)
3 tbsp extra virgin olive oil
2 tbsp red-wine vinegar           
1 cup of tomato juice (you might not use all of it, use to thin the soup out)
good pinch of sea salt and black pepper
            
This recipe is simple to make since everything gets blitzed together in a food processor. First chop everything (ensure deseeded) into a relatively small rough chop. Add in tomatoes, red chili and onion, pulse a few times and so on with the rest of the items, making sure to pulse/mix after adding few ingredients. Add tomato juice last – and use enough until you reach the right consistency and taste. Make sure it’s well seasoned since you will serve it cold. Blend well but note you can leave it a little rough as it adds great texture.  Refrigerate well (3-4 hrs) and serve chilled. The soup is best served the day of making but will keep for a few days in the fridge. Enjoy.

An education on food


Last week I was lucky enough to spend some time with the lovely Lyndey Milan.  Lyndey is a well-known food and wine person and has a wealth of knowledge on all foodie topics. I not only got to help her prepare for her weekly food segment on a daily morning show but also got to join her when she spoke to kids about food as part of the 'week of tastes' campaign.
The 'week of tastes' is an interesting program dedicated to changing the way children relate to food. As part of the larger Sydney International Food Festival, and amidst growing concerns about obesity and poor nutrition, it tries to raise awareness about the diverse and exciting world of food. I feel quite strongly about food education and think it’s vital for a society to know where its food comes from (not the grocery store!), whose labour goes into growing it and how it makes its way to kitchens.
 
As part of the program Lyndey did a demonstration on the versatility of carrots, showing them that this vegetable could be used in a variety of ways. Changing taste and texture allows you to create new foods. We started with (grated) carrots with a little freshly squeezed orange juice, and then moved onto a (purée of) cumin carrot dip, (creamed) carrot soup, and we finished with a (baked) carrot cake.
While the kids tried everything (with Lyndey’s encouragement) they couldn’t get enough of the cake! So I thought I would make one myself. This cake was full of carrots, sooo moist and had the perfect cream cheese icing. Try it out for yourself.

carrot cake with cream cheese icing

serves 10-12 large slices or if cut into bars makes 24 pieces
adapted from Lyndey Milan’s recipe

cake
3 eggs
1/2 cup raw sugar
1/2 cup canola oil
1 1/3 cup flour ( I mixed plain and wholemeal)
1/2 tsp salt
1 1/2 tsp baking soda
1 1/2 tsp baking powder
1 1/2 tsp cinnamon
1/2 tsp ground ginger
1 tsp vanilla bean/extract
2 cups (3-4 carrots) grated raw carrots
1/2 cup walnuts


cream cheese icing

150g cream cheese
100g icing sugar
lemon zest and 1 tbsp juice (1/2 lemon)
1 tsp vanilla extract/vanilla bean seeds


Preheat oven to 170 degrees C (150 for fan forced)
Grease and line cake tin (I used a round one)

For batter: beat eggs and sugar until fluffy and then add in oil and vanilla. In a separate bowl mix flour, salt, baking powder, baking soda and spices. Add dry ingredients to wet and fold in carrots and nuts. Pour batter into prepared tin and bake approx. 40 minutes.
Remove from oven and cool on rack.

To make icing: beat together cream cheese, icing sugar, lemon juice/zest and vanilla until light and fluffy. Ice cake when cooled down. The cake should keep in the fridge for up to 4 days.


A new take


I wanted something sweet to eat the other day and, as I mentioned in an earlier post, cookies are a new joy of mine since moving to Australia. Not wanting to leave my house, I searched the cupboards to see what they would lead me to. I found a LOT of oatmeal (my dad was visiting and since about half of his diet consists of this hearty grain we had stocked up on it). This naturally made me think of its most famous use – the oatmeal raisin cookie.  I wanted the cookies to be chewy and not too sweet. So I tried to find a good recipe but also one that I could easily adapt in order to reinvent the traditional oatmeal raisin cookie.

My search for recipes led me to one by SmittenKitchen – an amazing food blog with lots and lots of tested recipes. The ingredient list sounded good but of course I wanted to change a few quantities and types of products to test out my new take on the classic: I used 1/3 cup sugar, ¾ cup millet flour (instead of plain flour), ½ cup raisins, handful of walnuts and I had to add some chocolate (50g) – always dark. 
The millet flour made the cookies taste quite different. Instead of the classic, crispy exterior normally created by the baked oatmeal, the cookies ended up more soft and chewy, and almost a little crumbly (ie messy). The mess they made was well worth it – they turned out delicious! The strong taste of the millet worked to make the cookie seem grainy without the heaviness usually imparted by wholegrain flour.  The chocolate added that little extra touch!

Da best pizza


I know a fair number of die-hard junk pizza lovers. For them, a real pizza is the kind you find swimming in oil and oozing with cheesiness. For me that isn’t pizza. The best kind of pizza is the homemade kind: not mass-produced, and so fresh that the smell of yeast in the dough remains in the air, even after baking.  That is my kind of pizza.
There are a number of pizza recipes to choose from – my mom had a great recipe, my sister too. The other day I was reading Saveur ( best foodie magazine ever and seriously impossible to afford in Australia – thank you public library) and found an interesting pizza recipe. Of course I still had to change a few things...
Making the dough is easy but be careful not to mix too much sugar, salt and oil with yeast, because that way it won’t bloom. I added honey instead of sugar (this is what my sister does and I find it adds more flavour) and used half plain flour and half wholegrain. In the tradition of the Italians I use a few simple ingredients to make my pizza. It may sound strange to some but one of the tastiest pizzas I make has grapes, rosemary and red chili. Of course, I wouldn’t forget the parmigiano reggiano – a classic Italian cheese.
The fresh crisp pizza holds well with tomato sauce: otherwise known as a reddish concoction of goodness. I basically puree tomatoes and add sea salt, some crushed garlic and parsley.  If you don’t have time to make sauce, simply crush a few roma tomatoes in a bowl, that will do. Seeing as it’s wonderful to have some choice, I made a other few pizzas; one with sautéed mushrooms with gai lan (Chinese broccoli), and one with cherry tomatoes and bocconcini – all homemade, warm and gooey. Buon appetito!


pizza with grapes, rosemary and red chili (or other ideas)
serves 2-4 depending on hunger
adapted from Saveur No.127

1 cup water (tepid/room temperature)
1/2 package dry yeast (7g or ½ tbsp)
1 tsp honey
½ tsp sea salt
2-3 tbsp olive oil
3 cups organic flour (I used half plain and half wholemeal for a heartier crust)
3/4 cup tomato sauce (as mentioned above just use crushed tomatoes and cook if desired)


topping ideas
red or green grapes
fresh rosemary
red chili
steamed Chinese broccoli/broccolini
cherry tomatoes
bocconcini
Saveur’s recipe used squash blossom and burrata - yum.


For the dough: first bloom* the yeast by placing water in a bowl, adding yeast and honey, let sit until foamy (10 mins). Mix flour and salt and stir in water and oil to make dough. Transfer dough to floured surface and knead 8-10 minutes (and no less!) Create two balls and place into bowl – add a little oil to ensure they don’t stick. Cover and let sit in warm place to rise – about 2 hours.

Preheat oven to 225 degrees C (use a pizza stone if you have one as it helps increase the heat/surface for a crustier pizza)
To make pizza: take small ball of dough and using fingertips stretch out to size preferred. Cover dough with tea towel and let rest 15 mins. To prepare pizza, spread sauce over dough and add ingredients. Bake for about 10-12 minutes depending on size and taste. Enjoy.

*If I forgot to mention, bloom refers to a chemical reaction -- when yeast is activated carbon dioxide is created and therefore the dough will rise.

Snack time


I am not one to resist the temptation of snacking. In fact I prefer to eat small amounts of a few different items over the course of the day. But I am not drawn to these light-in-between-meal-treats solely for hedonistic reasons: snacking is actually very healthy ... seriously it is. That's in any case what all the health gurus say; having small snacks and meals is supposed to be better than just eating large meals.
My father has been visiting from abroad. And while he is a man who enjoys his merlot, he’s not known for a huge appetite: he eats like a bird. He doesn’t really think about food nor does he really enjoy it. Which has often made me wonder if he is really my father...
In an attempt to sway him towards eating, and knowing he doesn’t eat much, I thought it best to make a delicious snack that he couldn’t resist. Sometimes there is nothing more inviting than a table full of snacks with different flavours -- sweet, savoury, spicy, tangy --  just sitting there asking to be munched on. My mission was to make spiced nuts ... very easy and too delicious to eat just one.  This recipe was passed onto me by my sister but I changed it a little.
You could serve the spiced nuts alone or with some cheese and grapes - or any other fruits as the sweetness balances perfectly with the heat of the mixed nuts. This is a perfect and easy snack to have for parties. It takes no time at all to make and your guests will be left wanting more. Even my dad ended up eating quite a bit!